KineMaster Review: Pricing, Interface, Features, and More
Summary :
KineMaster is a versatile and practical video editing software, this page is a comprehensive review on KineMaster, for you to learn more about its pricing, interface, features, whether it is worth the subscriptions, and more.
KineMaster Review
KineMaster is a great video editing app that works on phones, tablets, or Chromebooks. It enables its users to edit their videos with ease with their creativity, using its powerful, functional and practical toolkits. It has earned a solid place on our list of 20 Best Video Editing Apps. However, some of us may still wonder, is KineMaster that good? We’ve thoroughly tested it and we’re confident to give you an unbiased answer, and the details on how to use KineMaster will also be covered. Now please read on to learn more.
Do Not Miss: 22 Best Free Video Editing Software, 22 Online Video Editors, 16 Best Video Editing Software for Mac
A Quick Look at Our Verdict
… KineMaster, a complete video editing software can meet your daily life at least and bring convenience to you. And with the increasing demand of people, KineMaster is constantly updating and perfecting various feedback and suggestions from users…
Pros and Cons
KineMaster takes its place among many mobile video editing software with unique design and powerful capabilities. Compared with lots of paid apps in the market, it is particularly attractive for its free promotion.
PROS
- Horizontal screen operation interface
- Complete functions
- Thousands of popular material resources(update weekly)
- Attached with the tutorial guidance for novice learning
- Real-time recording
CONS
- Advertisements (for the free version)
- Watermark (for the free version)
- Network quality affects the loading of “Get Projects”
Related Video Tutorial: How to Use KineMaster on PC
KineMaster Premium Subscription Pricing
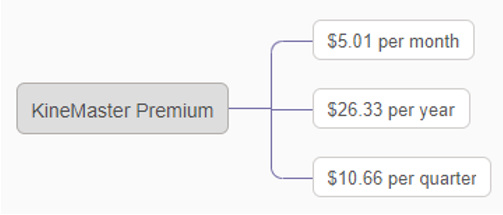
KineMaster Premium Pricing
What Subscriber Can Get:
You can own unlimited premium assets. And there is no advertisement during your editing. The most attractive is that you can download videos in a high resolution from 1080K to 4K with no watermark (“Made with KINEMASTER”). So, if you are a professional video editor, it is worthwhile for you to purchase a subscription. In contrast, the free version is fully up to your needs while you are a novice in editing or using it occasionally.
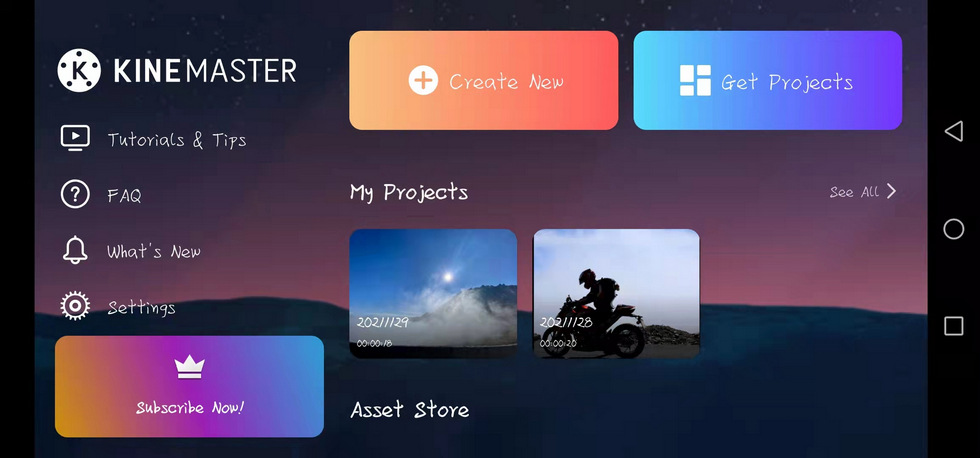
KineMaster Main Interface
You can have a deep understanding of the basic operation of KineMaster and video editing by tapping on Tutorials & Tips after you enter the app. And on the right, there is an Asset Store. Thousands of material resources are free here. Every material special effect features a reference tutorial, where you can learn to master the application of the special effect through detailed animation demonstrations.
Every time you open KineMaster, the subscription interface will pop up, and you only need to click the fork in the upper left corner to continue your editing tour.
Import Video to KineMaster
When you want to start an edition, click the Create New button to input your video. Then you can choose Aspect Ratios such as 16:19, 4:5, 2.35:1, Photo Display Mode, Photo Duration, and Transition Duration. You can add the media from your albums, your device’s camera, or KineMaster’s stock collection. What is very humanized is that after entering the operation interface, you can also import new editing content at any time by clicking the Media button.
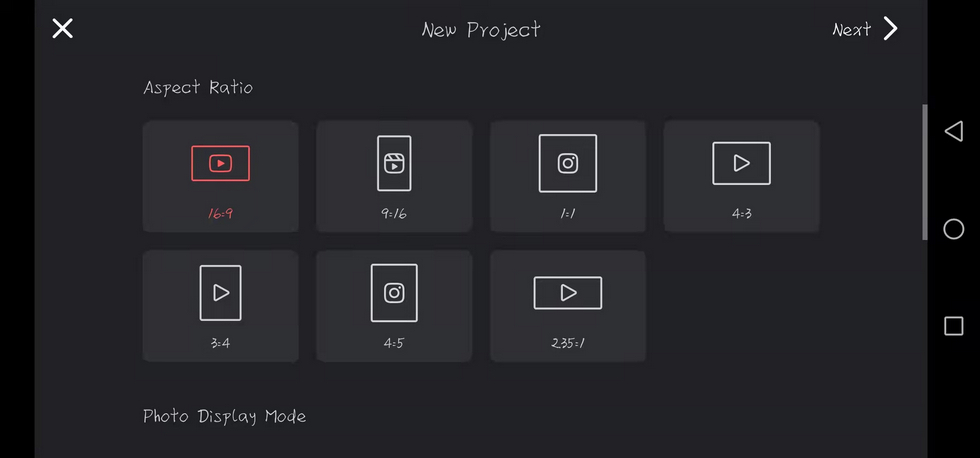
KineMaster Import Video
KineMaster Operation Interface
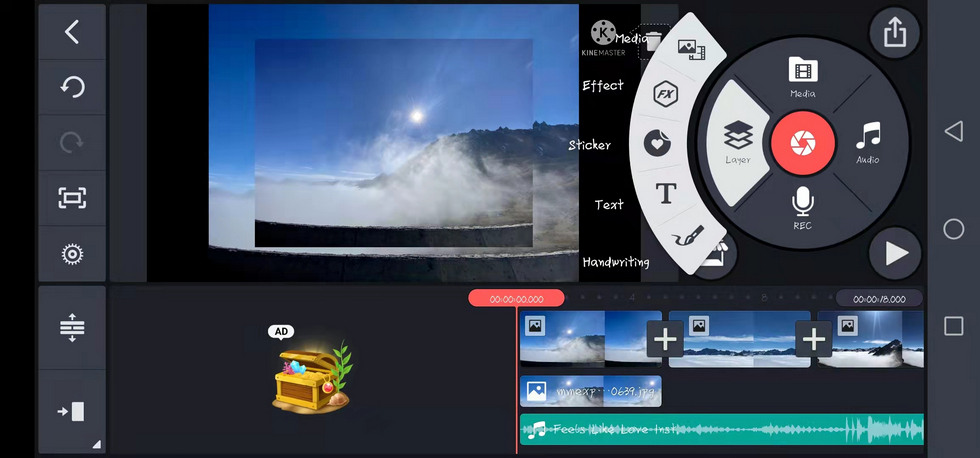
It is very enjoyable to have a horizontal screen operation KineMaster interface. The screen of our phone may limit our manipulation. So, this particular design is of great attraction which is similar to the desktop.
Meanwhile, it is regarded as a mobile version of the PR. The large circle you can see on the right is the Media Panel which makes the interface more intuitive and clearer. So the functions it includes are easy to look up and use.
In the center of this circle, you can record a video or take photos in real-time. (Please note that when using this function for the first time, a small window for requesting permission will pop up, and just click Agree) And the content you add will be the first layer, called the Primary Timeline.
As its name implies, the Primary Timeline determines the playing time of the whole video. So there can be no gaps between each frame in this layer. Around the circle, you can import media, record a voice-over, gain access to your device’s camera, create new layers for various types of overlays, add music, or access the KineMaster Asset Store.
Multiple Layer Editing
Click on the layer button on the right, you can stack and set up layers, while matting and making paintings in paintings. However, the multi-layer operation will still be difficult for the novice who does not have much experience. Basic editing needs such as adding text to videos are really easy with KineMaster.
KineMaster Operation Interface
For added layers, the default time is 6 seconds, and you can drag the layer border of it to adjust to increase or decrease the time.
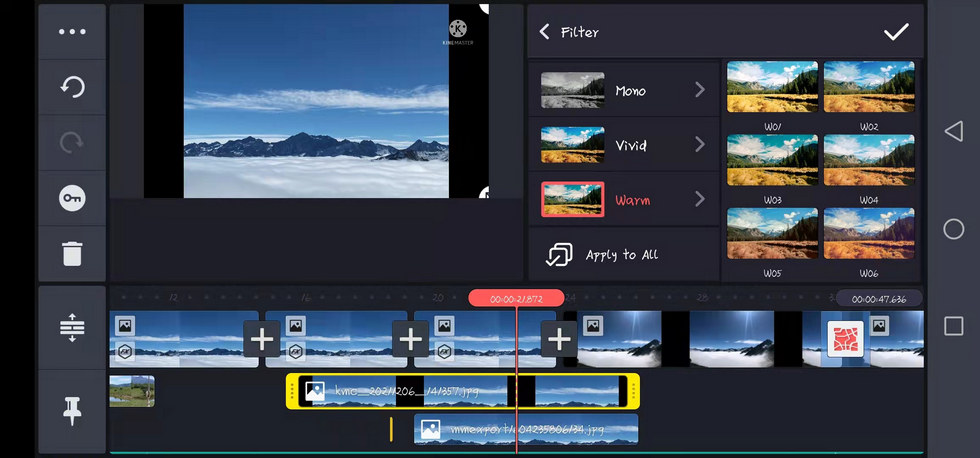
You can choose various color filters for your media in different periods. Meanwhile, since there are kinds of choices of hue and brightness for every color filter and you can also adjust its brightness, contrast, saturation, etc. by moving the slider, this will be more adapted to your needs for color. This can greatly save your editing time. The advanced color style will be easier to catch people’s eyes. However, it’s worth noting that you cannot add effects or filters beyond the end of the main timeline, because playback will stop there.
Kinemaster Filters
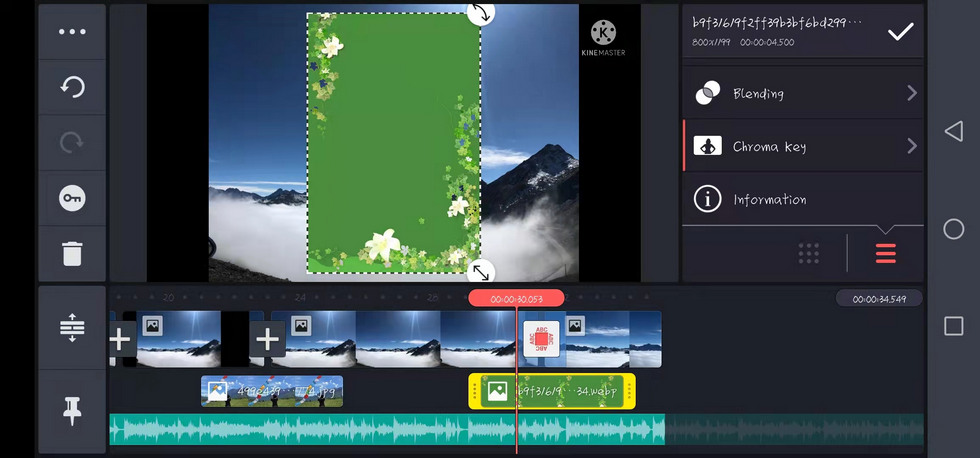
There is also a magical function that can eliminate the green screen. The Chroma Key button can be optimized by various options to blend the newly added picture into the background picture. That is, if you want to add yourself to a landscape photo, you can click this button after inserting your photo, adjust it according to the background color of your photo, and make a corresponding operation, to perfectly integrate yourself into that landscape photo.
For those in possession of a video with terrible background, KineMaster also allows you to change your video backgrounds in a few clicks. This function is similar to the matting function in the PS. Click on Apply to All button to make this filter run through your entire video.
Kinemaster Change Background

Kinemaster Chroma Key
Special Effects
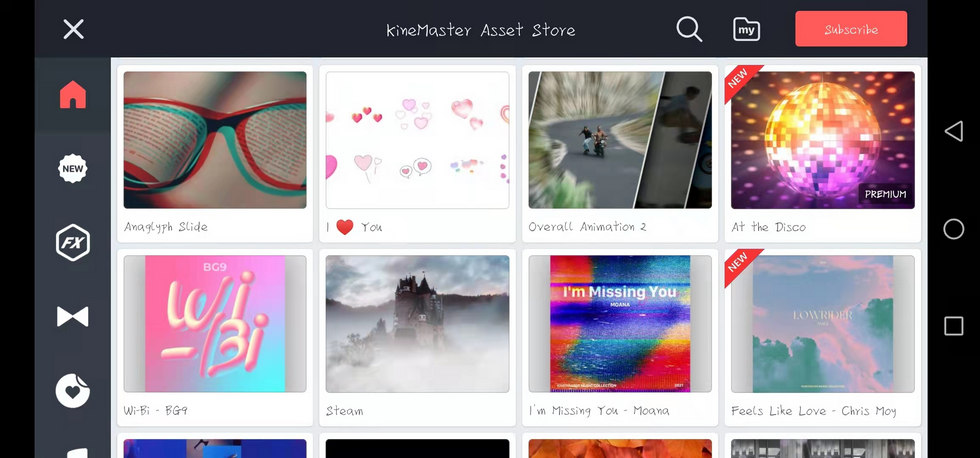
Gaussian Blur and Mosaic are default. More effects are put in the KineMaster Asset Store. You can search for what you are interested in according to the classification tags to the left. But it’s worth noting that each special effect has its suitable proportion of graphics. So when you add a special effect, it is necessary for you to consider the proportion of video footage it fits.
Those with PREMIUM logos need to be subscribed to download, You can click the preview effect before deciding whether to subscribe.
Kinemaster Special Effects
Transition Effect
Click on the “+” sign between the two frames to add transfer effects between them. There are two transition effects that I think are more special and may be used frequently. The first one is Text Transitions. You can add text to this transition to play a role in driving the plot. The second is 3D Transitions. This effect can make your video instantly have a sense of technology. But it also can be a disadvantage that the duration or speed of a transition is out of your control. It means that you only can get what you see. Nevertheless, there are many professional transitions that can be used for free, and they are classified, so you can easily find anything you want.
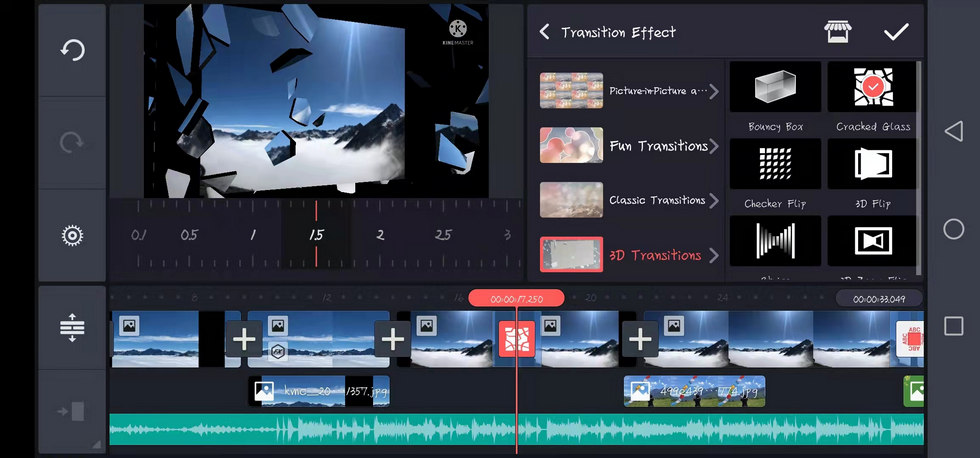
KineMaster Transition Effect
Music Insert
To add a piece of music for your video by tapping on the Audio Button is the same as adding a layer. KineMaster supports up to 4 tracks, and an unlimited number of audio clips can be added to each track. In addition, KineMaster has a powerful function to record off-screen voice.
You only need to click the REC button (you need to open the permission to access the audio) to record a voice-over for your video. This function is very convenient for those who need dubbing. (tips: For recording, please choose a relatively quiet place with moderate space, so that the radio reception effect is better). And in the end, if you are not satisfied with your tone or you don’t want others to recognize your voice, you can change the sound of the recording to make your voice sound like a child, an alien, or even a chipmunk.
At the same time, you can also add some special sound effects to your videos, such as harmony, reverberation, reverberation, and other effects. In order to make your video more infectious, KineMaster supports the setting of video playback speed from 0.25 times to 1.5 times, so that the video can be played in fast and slow motion. This operation can also effectively prevent your audio from being distorted due to being too fast or too slow.
Tips: It is very convenient to edit the content and special effects by directly pulling the progress bar below.
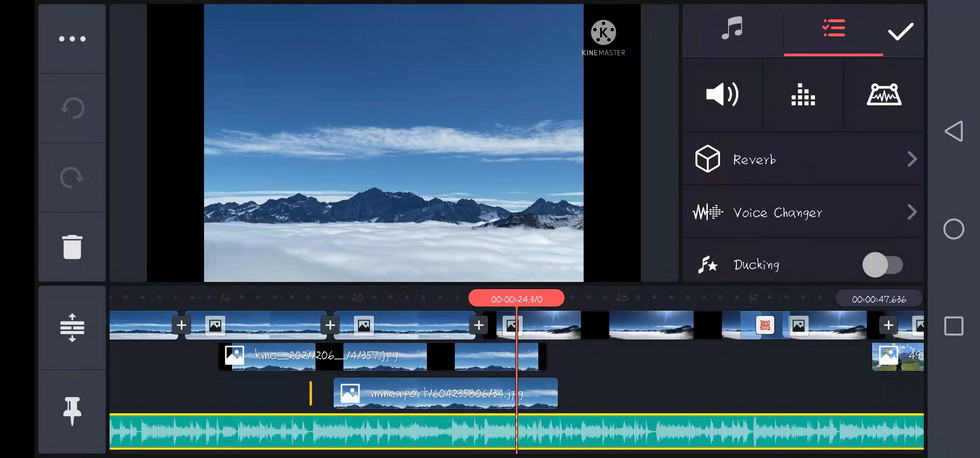
KineMaster Music Insert
Sharing & Export Features
You can press the video long after editing (. kine file) to rename, duplicate the project, and delete operations. It’s worth noting that it’s just the special effects recipe for the video that you share with your friends after export. If you want to share the video with your friends, you need to click on the arrow button in the upper right corner of the operation interface to download it. You can choose the Resolution and Frame Rate when downloading the videos. For best YouTube uploading performance, the ideal YouTube frame rate setting in KineMaster would be 24 to 60FPS
For the free version, the maximum support pixels is 2K. But this is also rare for other mobile phone video editing software! It can meet the needs of TV watching.
The cover set is an essential part of editing a video. A nice cover can attract more viewers to the video. The strong power of KineMaster lies in this. It can not only export videos but also capture your favorite pictures from your videos and store them in your mobile phone as pictures. Moreover, you can also perform position operations on it, and choose to set it as a header image or as a layer.
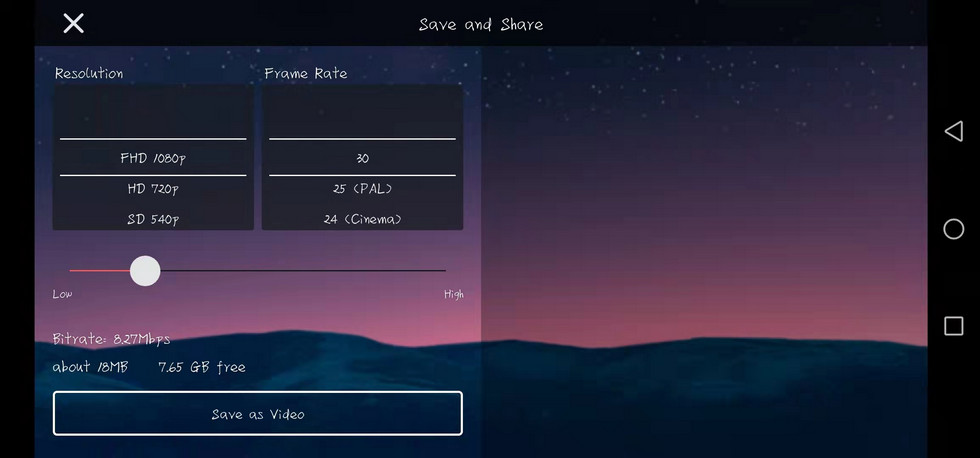
KineMaster Export
Other Features
Left function bar: From the top down, there are three horizontal points that can make a duplication or duplicate a frame as a layer. At the same time, this function is not only applicable to the main layer, it can do some positional operations on the secondary layer. For example, bring forward, send to back, or place in the center vertically. We can see that there are two clockwise and counterclockwise circular arrows on the left side of the operation page.
If you are not satisfied with what you just did, you can click the counterclockwise button to withdraw, and click the clockwise button to restore the withdrawal. The sun-shaped button below allows you to edit the video as a whole. The next button like a key supports you to make a dynamic operation for the secondary layer. That is, this button allows a static photo to move from left to right. The button below shaped like a trash can is the delete button.
If you want to delete a picture, you can not only click here but also click the scissors button on the right. Click the three horizontal bars to expand the video for more accurate editing, and when you add too many layers, click this button to let you see all the layers you made. Finally, the icon of the nail is that the window can be fixed at the top, which is not affected by other operations.
Automatic save: For us living in a fast-paced lifestyle, most of our time is fragmented. If we need to quit suddenly in the middle of our operation to deal with other things, such as dealing with work on Whatsapp or the phone abruptly loses power. This software will automatically save your current operation for you intimately so that you can continue your previous editing when you enter again.
Now, it is installed by 19 million users. KineMaster can better meet people’s high demands compared with basic applications like Apple’s iMovie. At the same time, KineMaster has settled into several apps. You can learn about KineMaster and master more video editing skills through these channels. If you encounter some unsolvable problems, especially when purchasing a subscription, you can also have feedback to their email address: [email protected]
KineMaster Specifications
Devices Supported: Compatible with iPhone, iPad, and iPad touch
| iOS | iOS v11.4 or later |
| Android | Android OS v6.0 or later |
| Web-based | |
Verdict
KineMaster, a complete video editing software can meet your daily life at least and bring convenience to you. And with the increasing demand of people, KineMaster is constantly updating and perfecting various feedback and suggestions from users to enhance users’ experience. Especially compared with desktop editing software, you can shoot and edit videos whenever and wherever possible. At the same time, if you want to learn something about editing, you can begin with its powerful material assets and detailed reference tutorials.
Of course, if you are a dedicated video editor, there may still be many places where KineMaster can’t meet your requirements in terms of professionalism. Therefore, it still can’t replace those pieces of professional desktop editing software.
Additional Reading: Best Free KineMaster Windows Alternative You Should Totally Try
FilmForth is on the top of our list of best free video editing software and it can serve as a perfect KineMaster alternative for Windows 10 and Windows 11 PCs. FilmForth is intuitive, and incredibly easy to use, and it doesn’t export videos with watermarks, making it a perfect option for video editing beginners.
What’s more, FilmForth can be versatile as well, it offers a variety of video editing options including trimming videos, cropping videos, resizing videos, adding customizable text to videos, splitting videos, adding gifs/stickers/special effects to videos, detaching/changing/adjusting audio, adding transitions, reversing video, changing video playback speed, even creating YouTube intro with templates, and a lot more.
FilmForth is available from Microsoft store, hit the download button below to get it for free, and it will install on your computer in less than 2 minutes!
How to Edit Videos with FilmForth Free and Effortlessly
Step 1. Import Video into FilmForth
Editing video with FilmForth is super duper easy, first launch FilmForth from Windows start menu, hit the New Project button in the middle, and click ADD VIDEO/PHOTO CLIPS button to import your videos/photos.
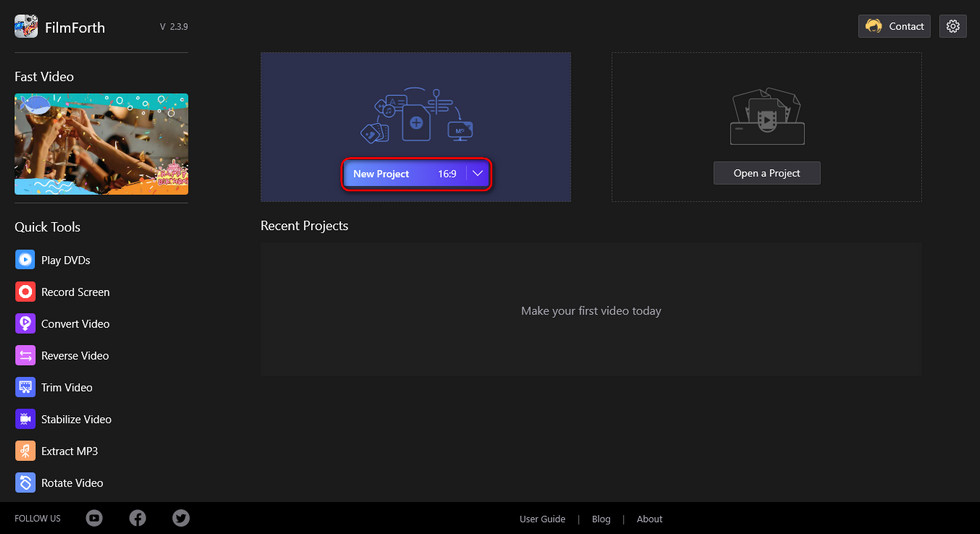
Import the Video
Step 2. Edit Videos with FilmForth
After videos are added to FilmForth, you can click to select a video clip in the timeline to edit it. There are clickable buttons in the timeline and the operation panel below for you to quick edit the video.
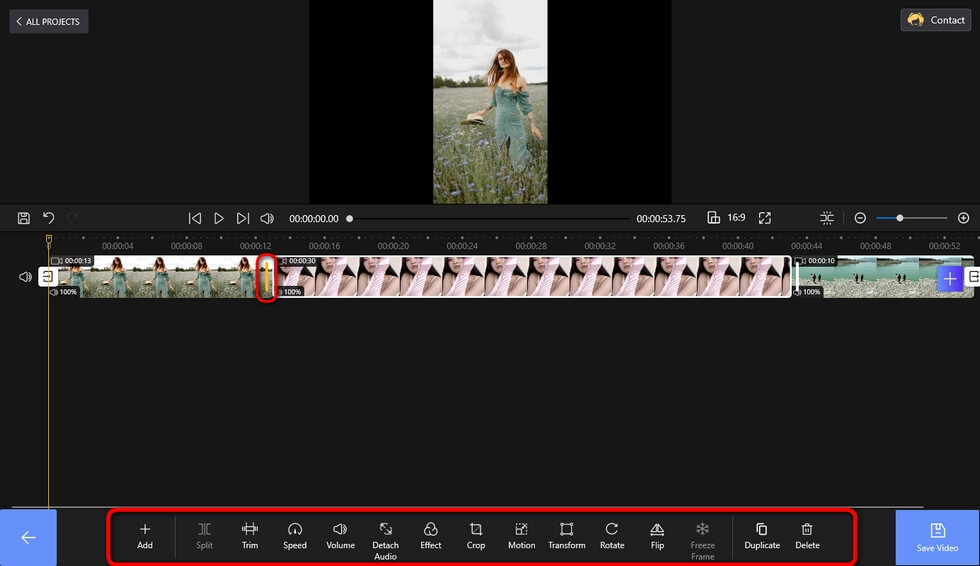
Edit Your Videos
Step 3. Export Videos from FilmForth
When you’re done editing, hit the Save video button from the lower right side to customize video parameters and export the video, simple as that! So don’t hesitate to give FilmForth a try!
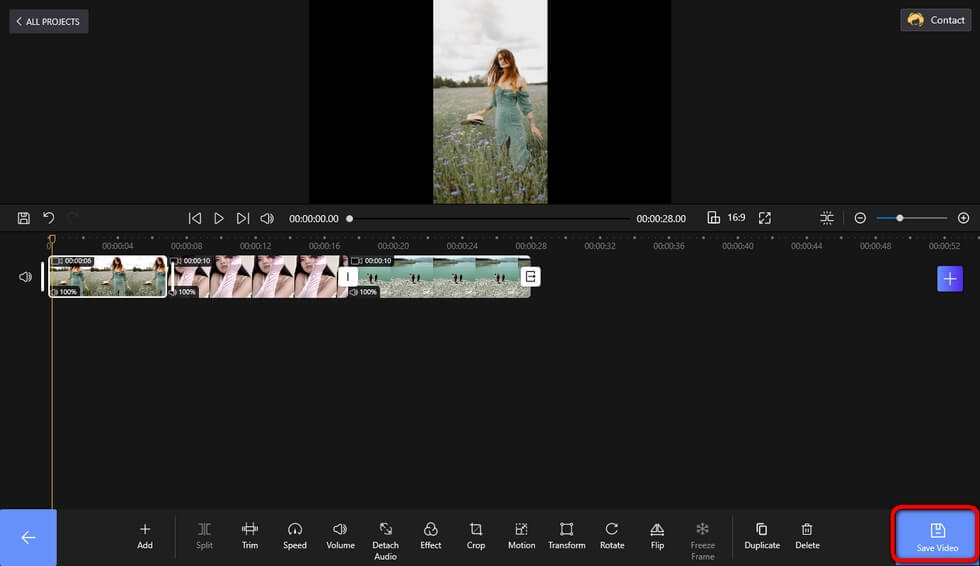
Save and Export Video

